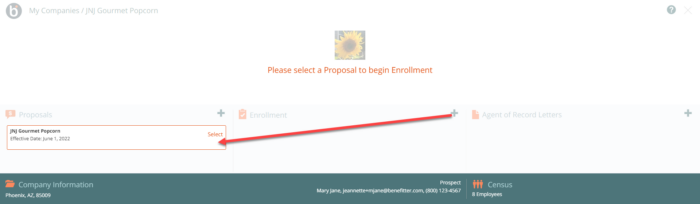
Enrollments in Benefitter are based on a proposal. Once a client has chosen the benefits they wish to offer their employees, please check to ensure that the proposal off of which you will base the enrollment:
- Has the correct effective date;
- Contains as “selected plans” all of the plans, across all coverage types, that the client has chosen;
- Is based on a census that contains all employees;
- Has accurate contribution levels for each coverage type.
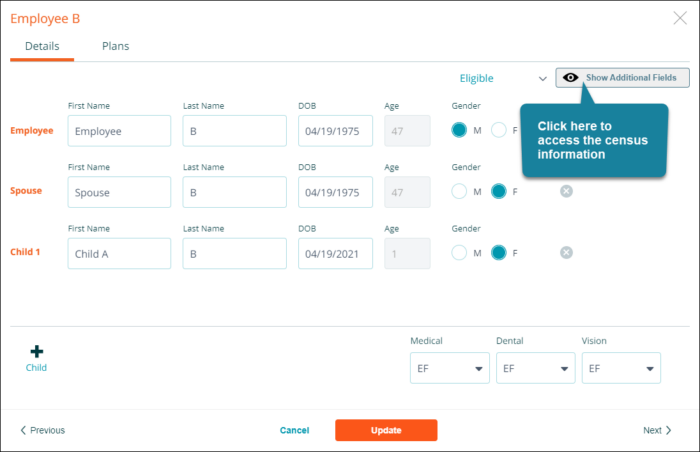
In addition, please fill in as much census information as you have available; this information will be pre-filled in the employee experience and will make the employees’ experience easier.
Create the Enrollment – Fully Insured
In the enrollment section on the company homepage, click on the + icon. Select a proposal to use to create the enrollment
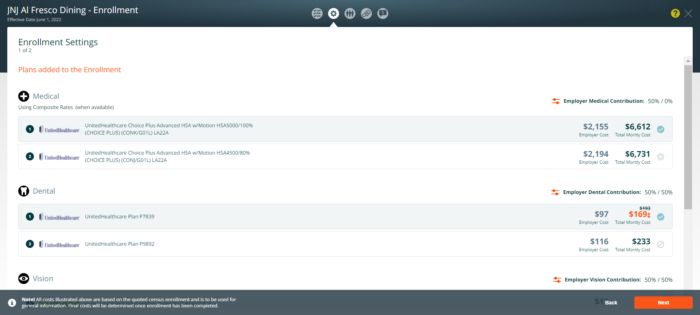
Enrollment Settings Page 1 of 2
Add plans to the enrollment:
- Select the plans to include in the enrollment by clicking on the + icon
- Plans cannot be updated after enrollment creation
- If you have more than one medical plan in the enrollment, click on the make default plan link to choose a different default plan.
Click Next to proceed to page 2
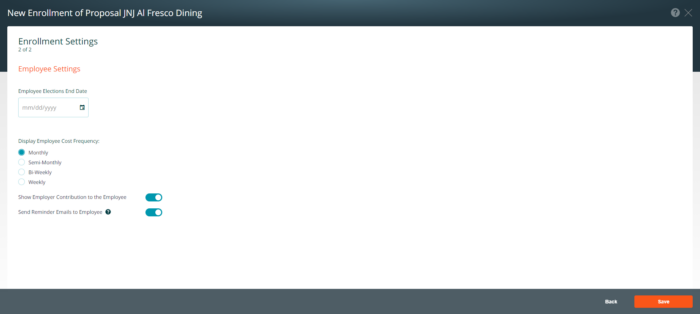
Enrollment Settings screen 2 of 2
Employee Settings
- Choose a deadline for employee elections
- Select the period for showing employee costs (monthly, semi-monthly, bi-weekly, weekly)
- If desired, turn off the Employer Contribution toggle to hide the contribution amount from employees
- Use the Reminder Emails toggle to activate follow up emails for employee elections
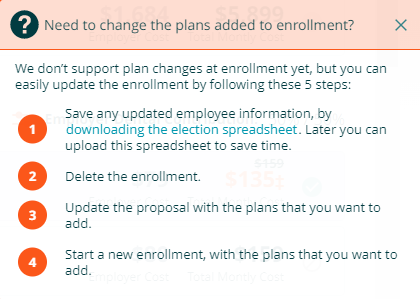
After saving the enrollment settings, if you access the enrollment settings the system will display a message providing instructions for changing the plans in the enrollment.
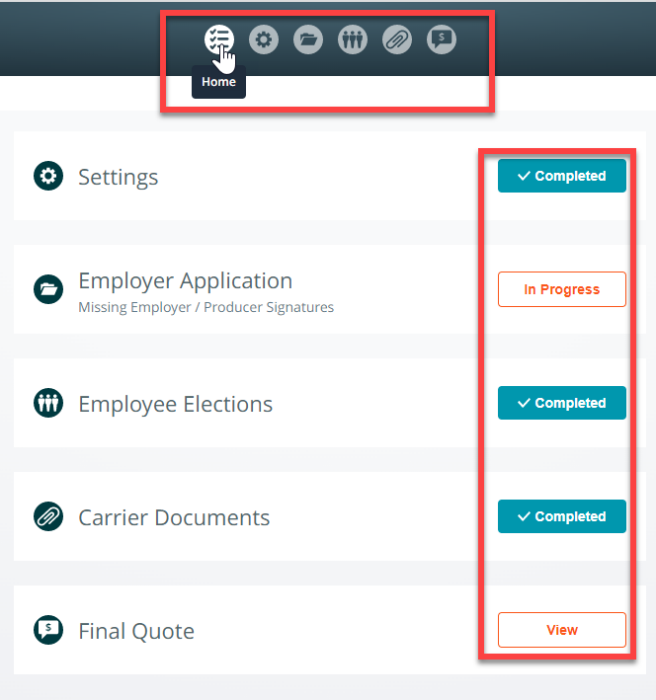
Enrollment Checklist
The enrollment checklist guides you through the enrollment processes. To access the checklist items, click on the icons (settings, employee elections, carrier enrollments, and final quote) located in the top center of the enrollment screen. Or click on the start button on the checklist item to complete the enrollment steps. The status of each checklist step will be set to: Start, In Progress, Completed, or View.
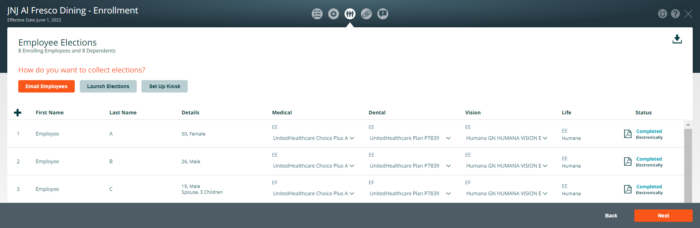
Manage Employee Elections
On the Enrollment screen you can update an employee’s census information by clicking on their row on the Employee Elections page.
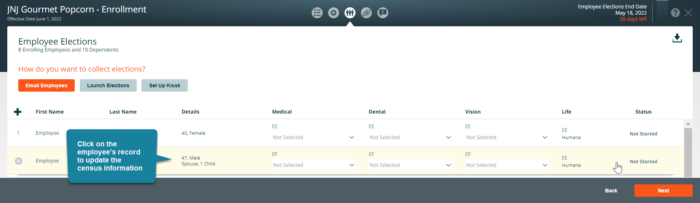
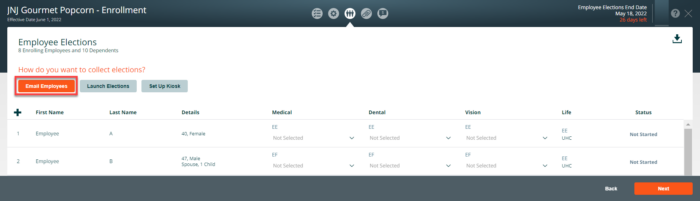
Fully Insured – Below you will find the options to collect elections:
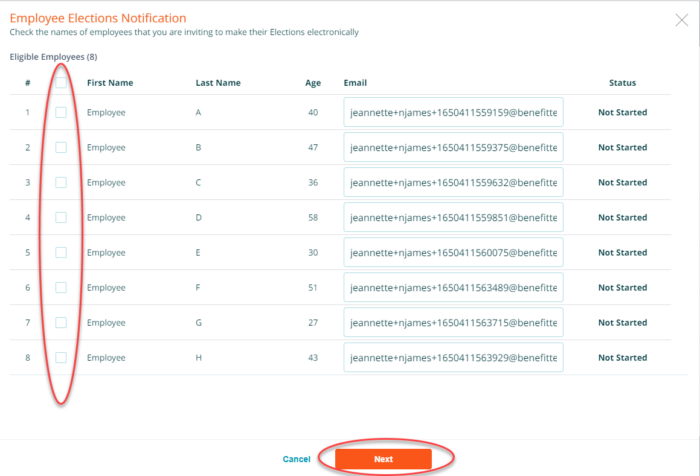
Email Employees – Send employees an invite to complete a mobile-friendly enrollment. On the employee notification page, click email employees. check the names of employees that you are inviting to complete their Questionnaires electronically.
On the Employee Elections Notification screen, check the names of employees that you are inviting to make their Elections electronically. Click next.
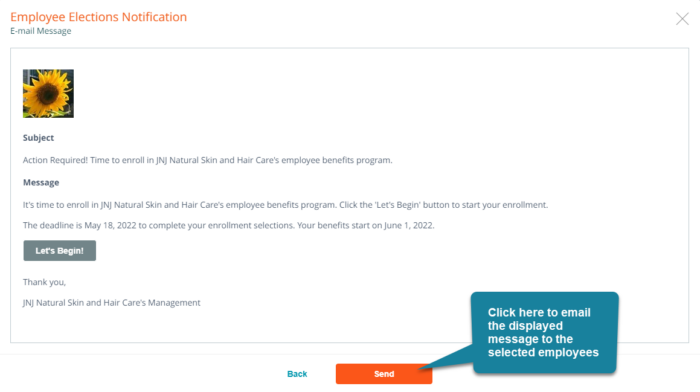
The email message below will be sent to the employees.
You can return to the notification wizard at any time before the enrollment end date to send additional notifications to employees; you may wish to do so to remind them when the enrollment end date is approaching.
Launch Elections
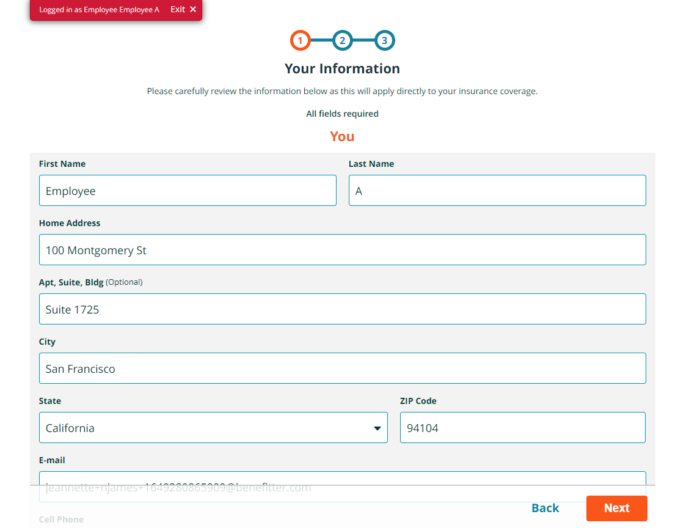
You can access the employee experience to walk an employee through their benefit election, or so that you can complete or correct their responses. To complete their benefit election, the employee should have on hand (for themselves and their dependents) the following information:
- Dates of birth
- Social security numbers
- Home Addresses
- If enrolling in HMO plans their current primary care physician names & ID numbers
To access the employee experience on behalf of an employee click on Launch Elections.

Select an employee name and press access employee.
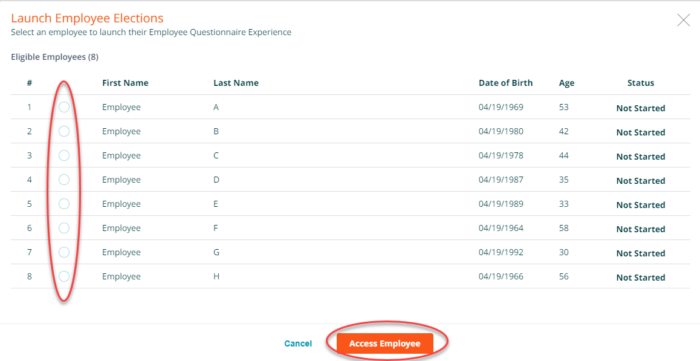
You will briefly see the employee login page; the system will automatically sign you in as the employee and take you to the Welcome screen.

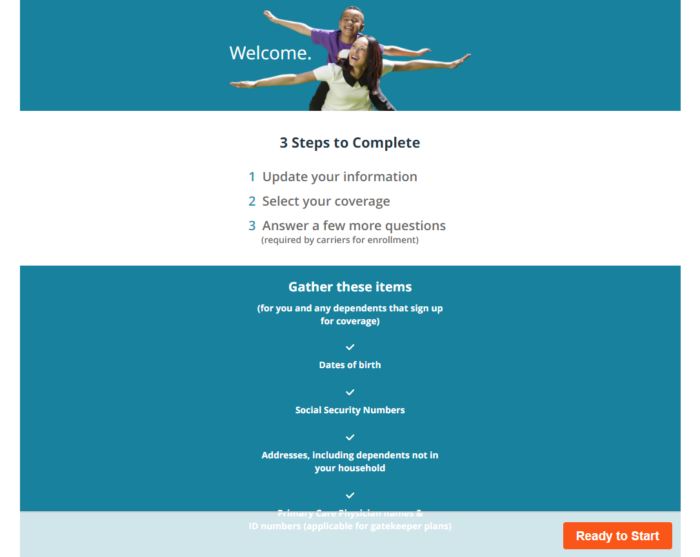
Welcome page
The employee’s name that you accessed will appear in the upper left corner of the screen.
You/and the employee) can:
1. Complete and correct their census information
2. Select the coverage they’d like for them and their family
3. Answer any additional questions required by the insurance companies for enrollment
Reminder: Any changes that are made may impact which questions are asked in the Additional Questions state of the enrollment. Please be sure to review and complete all screens following any changes. For more details on the employee experience, please see the Employee Benefit Elections Experience user guide.
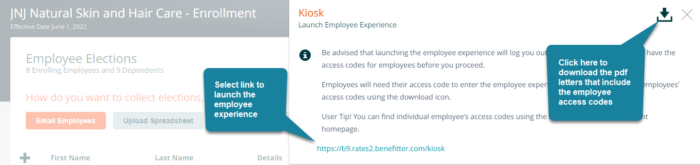
Setting up a Kiosk
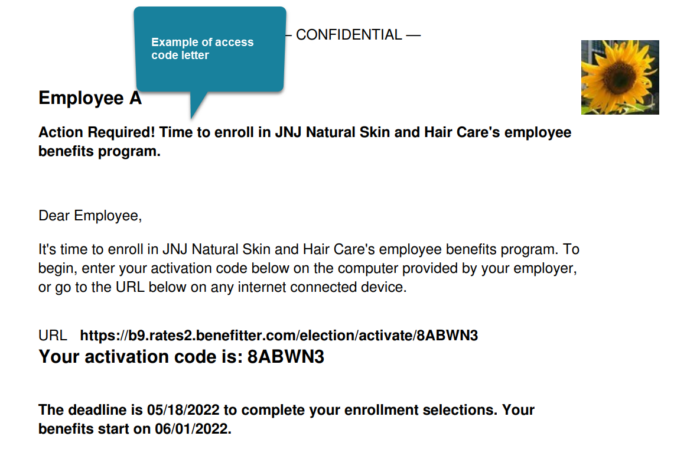
The kiosk functionality enables you or your client to set up a computer in the workplace where employees can access the employee experience. This is particularly useful when the client does not have an email address for all eligible employees. To access the kiosk feature, click on the Set Up Kiosk button.

Employees will need an access code to use the employee experience via the kiosk feature. To download letters with employee access codes, click on the Launch Kiosk button on the Employee Elections page, then select the download icon in the upper-right. You can launch the kiosk functionality by clicking on the link on this screen. Doing so will log you out of Benefitter, so make sure you have the employee access codes before you proceed!
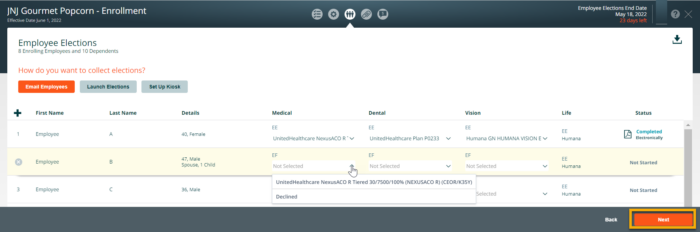
Enroll Employees in plans on the Employee Elections page
Click on the down arrow under each coverage tier and select the plan. Press save after enrolling the group in the plan(s).
Track Employees’ Election Status
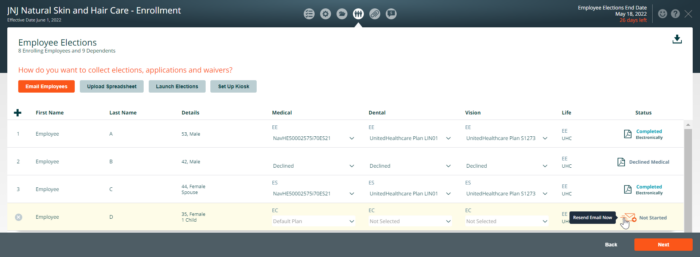
The Status field on the Employee Elections page shows where each employee is in the enrollment election process.
The enrollment statuses are as follows:
- Completed: The employee made their coverage choices and provided all required additional information. They can still make changes to their coverage choices until the enrollment end date.
- In Progress: The employee has logged into the employee experience.
- Not Started: The employee has not been sent an email notification, nor have they logged into the employee experience.
- Declined: The employee has logged into the employee experience and declined coverage.
To encourage employees to complete their enrollment, you can resend the enrollment email notification to the employee by clicking on the envelope icon.
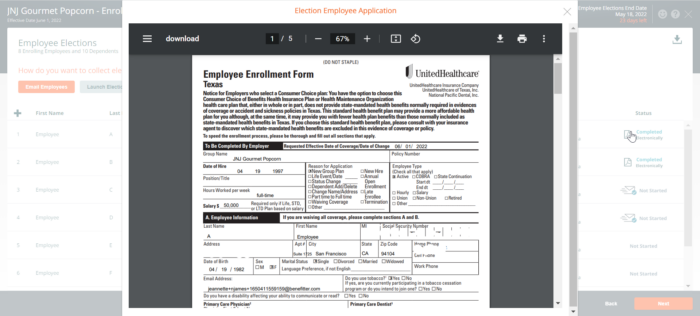
To view an employee’s chosen coverage options, click on the PDF icon for that employee.
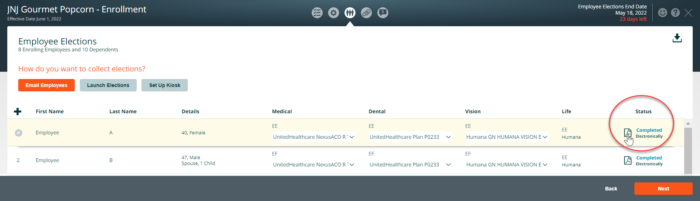
You can review, download, and print out a copy of the employee’s application.
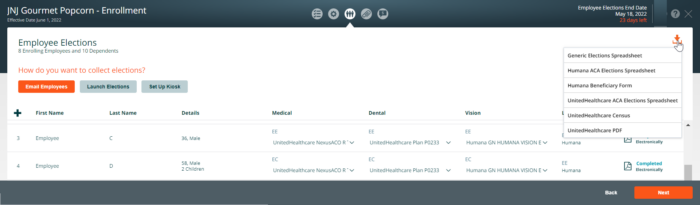
Completed Enrollment Download Elections Spreadsheet
After the enrollment has been completed, click on the download icon to download documents such as the United Healthcare ACA Elections Spreadsheet, United Healthcare Census, UnitedHealthcare PDF (employee elections), etc. Press next.
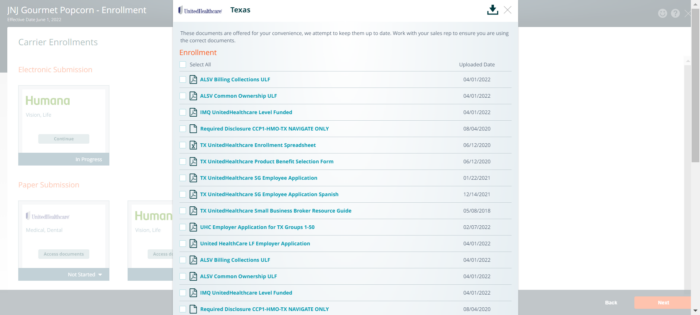
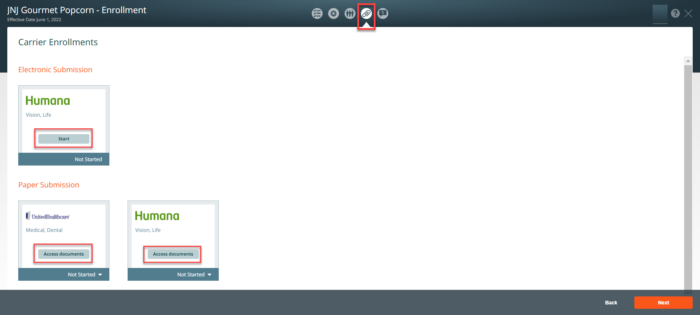
Paper Submission
Most carriers have not yet fully integrated with Benefitter for electronic case submission. For these carriers, you can still access enrollment documents and track your progress within the enrollment module in Benefitter.
To access the enrollment documents, click on the paper clip (carrier document icon). Select the Access Documents button for the carrier whose enrollment documents you need. To initiate the Humana Electronic Submission process, click Start. To learn more about the Humana Electronic Submission process refer to this knowledge note
Select the individual documents you wish to obtain (or the Select All checkbox) and then click the Download icon in the upper right-hand corner of the window.